3.5.4 Organisation

Accessed via Workbench -> Settings
This tab has 4 sections:
- Users
- Supplier Invoice Authorisation
- Security
- Email Templates
- Block Packages
1. Users
This section allows you to add new users as well as edit existing users.
Add User
To add a new user, click on the [Add User] button:
User Groups
When adding users on the system, you can decide under which user group they belong to as well (Superuser or Standard) which determines their access to the settings screen.
The Superusers will be able to access the settings screen and the Standard users will not be able to.

Once you have filled in the relevant details and click [Save], an email is sent to that email address with a link that allows the user to set a password and access the system.
View User
You can make users inactive on this screen as well as reset their password if you click on the [View] button:
You can also see if they have setup their 2FA (Two Factor Authentication) which adds more security to their login (More info below in the Security section) as well as Reset the 2FA.
User Roles
Users can also have roles associated to them. Currently we have roles enabled for the Site Inspection module and there may be more coming in the future.
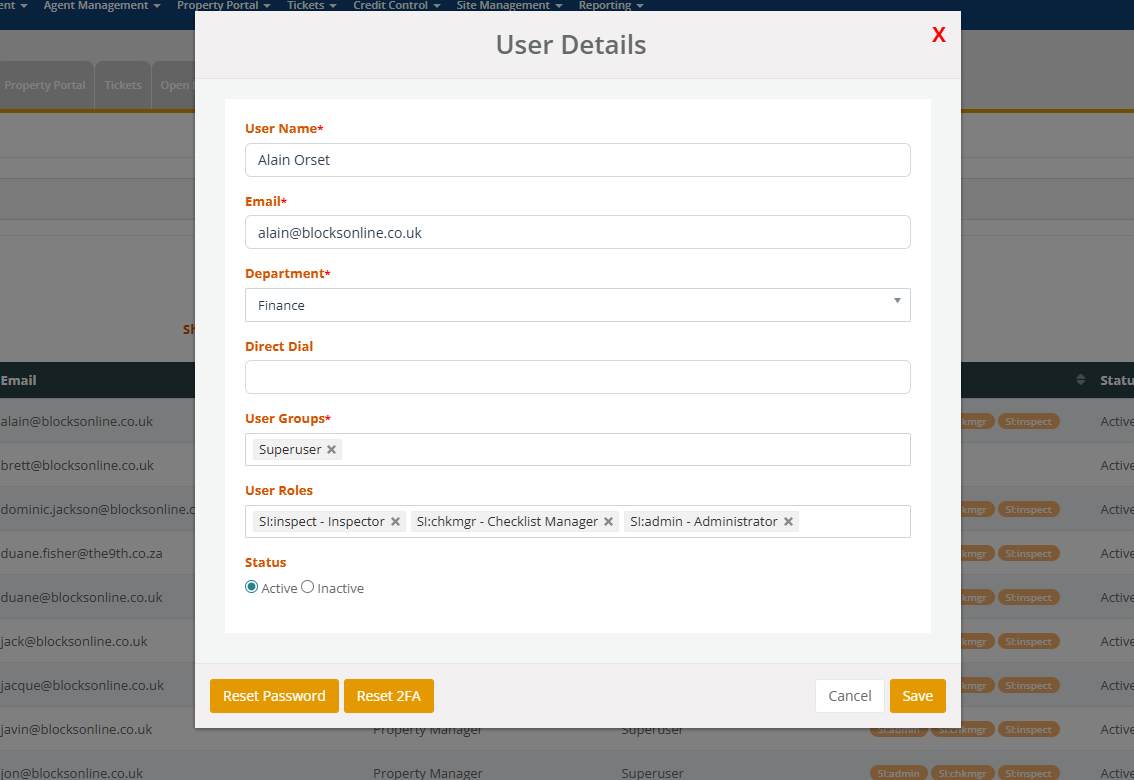
Site Inspection Roles
Inspector: This user has the ability to use all screens that allow them to complete an Activity, from the on-site inspection screens, to the desktop edit and the publishing of the Activity report.
Checklist Manager: This user has the ability to create and manage Checklists that can then be used during an Activity on-site visit.
Administrator: This user can access and use the admin(e.g. user management) and Product settings screens only. They control the configuration of the Product which determines how the Product behaves for the other users.
PEEPS
Peeps Administrator - This user has the ability to manage PEEPs within a unit and have access to personal information that is relevant to the user in the unit relevant to PEEP.
2. Supplier Invoice Authorisation
This tab allows you to control whether the Invoice Approval Process is turned on or not. It will also allow you have an additional check so that supplier invoices (expenditures) are fully allocated to block schedules:
Once you turn this on, all supplier invoices that are created in the system, will have to be approved prior to it being paid on Blocks Online.
The approval limits determine who can approve and how much can be approved for supplier invoices.

NOTE: If you turn this on after creating supplier invoices then those invoices will be approved in the background but won't appear in the Bulk Supplier Payment Run as they were added on prior to this function being turned on.
Supplier Invoice Allocation Check (Multiple Schedules Only)
This check will allow you to make sure that supplier invoices are not approved if the expenditure has not been fully allocated to the block schedules. This is to prevent excessive manual work to adjust expenditures during end of year accounting.
If Supplier Invoice Approval Process is turned off then this is also turned off but you can choose whether this check is enabled or not after turning the Approval process on. This gives you the control as the user on how the invoices should be approved.
More information on the Invoices Approvals on this KB article: 4.5.7 Supplier Invoice Approval Process
3. Security
This section allows
you to turn on and off the Two-Factor Authentication (2FA). As an ongoing
upgrade to the security of our system, we have now enabled 2FA so that users
who login to the system will have to authorise the login before they can use
the system. The function is an agent wide setting so you will have to decide
whether this applies to your whole organisation.
You have to first turn this option on and then once turned on, follow these are the steps:
1. Login into the Workbench (https://www.myblockonline.co.uk/rel3/admin/WorkbenchLoginController)
Once you have
logged in, you will be prompted to enter a code:
We recommend to download 'Authy' (more info on this app: Authy) as it allows you to transfer the app info to other devices if you change phone for example but it is your choice.
In the Authy app, if you click on the 3 dots on the top right hand side, it will allow you to add an account.
Once you click on this, there is an option called Scan QR code (Allow the app to use your camera on your device).
After scanning the QR code, it will display our system on there which you can save.
Once saved, you will see an
authentication code which you can enter onto the screen and then 'Validate' the
login.
4. Email Templates
This section allows you to edit the basic emails that are in the system. These range from demands, credit control letters to receipt emails and portal invite emails.
For some you can edit the basic email and for others you can create multiple templates.
The ability to have multiple for all the template types is a future enhancement - one that will be looked at in our future development path
The list of emails contain some system standard emails. These are the default emails that we as Blocks Online have created as a standard. They are identified by a grey label:
Add Template
Allows you to add a new template under the relevant template types. At the moment you only have 5 template types where you can create multiple templates:
Edit
This allows you to edit all the templates that are show in the list.
If you edit a System Default template, a new template is added for you and the system default changes. You can then add the relevant placeholder and it will be replaced by the actual detail when the email is sent.
For multiple email templates, you can have one as the default.
For example, the communication has 2 templates and one is the default which is automatically picked whenever you are sending an email via the Communication screen:
This is the list of email templates that you can currently edit (Single - can only edit one version of this template, multiple - allows you to add multiple versions of the template and then can choose from this in a drop-down when sending email):
- CC Case - Zero Account Balance (Single) - When a receipt is matched to an invoice for a unit and the unit has a credit control case where the unpaid amount goes to zero, an email is sent to the user in the company who is part of the Legal department. It advises them to close the credit control case.
- Communication (Multiple) - You can send generic emails to users in a block from the Workbench. The communication email is generic but you can create multiple templates for this type.
- Credit Control Letter (Single) - The basic email that goes out when you send credit control letters from the distribution manager.
- Demands (Single) - The basic email that goes out when you send demands/fee collections from the distribution manager.
- Leaseholder Statement (Multiple) - The basic email that goes out when you send statements for units from the Leaseholder statement screen.
- Portal Invite (Multiple) - The basic email that goes out when you wish to send login details to leaseholders.
- Portal Notification - Add Block Post (Single) - The basic email that goes out to leaseholders who have chosen to be notified whenever a new block post is added.
- Portal Notification - Block Post Comment (Single) - The basic email that goes out to leaseholders who have chosen to be notified whenever a comment is added to a block post.
- Portal Notification - Post Problem (Single) - The basic email that goes out to leaseholders who have chosen to be notified when a problem is reported. This is for those who have got the transparency turned on for some block.
- Portal Notification - Report a Problem (Single) - The basic email that goes out to leaseholders who have chosen to be notified whenever a problem is reported.
- Portal Notification - Report Unsuitable Block Post (Single) - The basic email that goes out to the managing agent staff when a leaseholder reports a block post as unsuitable.
- Quotation Requests (Multiple) - The basic email that goes out to suppliers through tickets when you raise quotation requests.
- Receipt Created (Single) - The basic email that goes out to leaseholders who have chosen to be notified (or the leaseholder preference is set by the managing agent) whenever a receipt is recorded in the system. This can either be a manual receipt or imported receipts.
- Work Order (Multiple) - The basic email that goes out to suppliers through tickets when you raise work orders.
5. Block Packages
This section allows you to add/edit/delete block packages. Packages is a way to group blocks together in order to manage certain blocks belonging to a group in a different manner. For example, you could have a Gold package which provides more support or reports than the Silver package.
To add packages click on the Add Package button. This will open up the Add Package model:
You can add a description to detail what the package is related to. This description is then shown as a tooltip in the home screen as you hover over the small blue information icon.
If you click on Edit against a block package then you can update the details of the package.
You can also Delete a package, providing there are no blocks associated to it. If that is the case, then the Delete button will not be active.
If the name of the package entered already exists for new packages or as an update to an existing package, then you are presented with a warning to prevent duplication:
Related Articles
3.5.13 Site Management
Accessed via Workbench -> Settings -> Site Management tab - see screenshot below Please ensure the relevant roles are setup for the Site Inspection module in order for users to have the right level of access. Please see the User section on this KB ...7.5.1 Sending Reminder Letters via Email
The Credit Control module has the ability to send reminder letters via email. Whenever a letter is produced, either via an individual credit control case or through one of the Batch functions, the letter can be sent to any leaseholder where the ...2.3 Access Control
The system has various screens that are available for users. Most of these screens carry an audit trail and most of these can also be restricted per user. By default all users who are given access to the system are able to view and update all ...3.6.1 Checklist Management
The Checklists screen is where you can see a list of your Checklists, manage them and add more if you need. Access via the Workbench Menu -> Site Management -> Checklists You can only access this screen if you have been assigned the Checklist Manager ...3.6.0 Site Inspection
The Site Inspection Tool supports you in undertaking Property Management inspections. Specifically, it supports: Setting up of visits for the completion of inspections on a timely basis. Controlled inspections driven by Checklists that you have ...