4.2.2 STEP 2 - Set Up Block Information

Access via the menu option: the block -> Block Summary

To watch a video on how to carry out this process, please click on this video: 4.2.2 STEP 2 - Set Up Block Information
Block Details
This section contains basic information about the block such as the block address and who the property manager is.
You can also determine under which branch the block belongs to (if your company has multiple branches that it operates from - these will need to be set up in the agent settings screen within the Workbench so it is available in the Block Summary screen).
The sponsor can also be changed on this screen. A sponsor is someone like a senior property manager or a financial director.
If you click on the [Edit] button on the top right, you can edit the details.
Here is also where you can re-assign the block package from one to another (if you have multiple block packages - more info on this KB article: 3.5.4 Organisation)
Here is also where you can re-assign the block package from one to another (if you have multiple block packages - more info on this KB article: 3.5.4 Organisation)
You can also add general notes about the block on the right hand section.

NOTE: Notes can be edited by anyone
Units
This section contains details about the units within the block. You can add, reorder, view and even delete units.
You can add new units by clicking on [Add Unit].
You are then presented with a pop which allows you to enter the number of units you require and then you can add in the unit name for each of them.
You can re-order units as well by clicking on the [Reorder]. Simply drag the unit into the desired position and this will reorder the unit.
Unit Details
You can see the details of the unit by clicking on the[View] button.
The unit details have a dashboard style layout which allows a quick view of all the details without having to scroll.
There are a few sections on this screen with each having its own purpose:
Unit - Here you can enter the Unit name which is the system's name displayed on the block summary screen as well as drop-downs in the system where you have to select a unit. This section also contains the [Next] and [Previous] button that can be used to go to the next and previous units without having to go back to the summary screen. You can also amend the unit details by clicking on the [Edit] button.
Unit Address - The full unit address where the unit resides
Correspondence Address - The address that is required to post any correspondence to the unit. Often this is the same as the unit address and in those situations, you can just tick the 'Same as Unit Address'. When you do this, the Correspondence Address lines disappear (If you don't have this option ticked but Line 1, Line 2, Line 3, Town, Postcode are the same on both address sections then it has the same effect).
Ownership - (i.e. ownership) key information relating to the unit:
- Name of Legal Owner - the name of the person, people or company that own the unit; this is used for addressing demands and correspondence
- Name inc. Salutation - used as the introduction for letters and emails (e.g. Dear Mr Smith)
- Ownership Start Date - If the 'Ownership Commenced On' field is left blank any financial data produced for the current Legal Owner will be driven from the date of the Opening Balances set for the Block. However if you have the actual date when the Legal Owner started their ownership of the unit you can input that date here.
- Tenant Reference - This reference is printed on the tenant’s demands and they are asked to quote this reference when making a payment. If you have an existing reference or code for each tenant, and you wish to continue to use it, then it can be entered here. Otherwise the system will allocate a unique reference number for the tenant
- Tenure - You can choose whether the unit is a Leasehold, Freehold, Commonhold and Other. 'Freehold' properties will result in the section 47 / 48 notice being excluded from service charge demands and will alter the text on Ground Rent demands, otherwise it will be included. If the Tenure is Freehold then the Service Charge text on the demands will be changed to Rentcharge due to legislation (Gov.co.uk Website - Rentcharge).
- Change of Ownership - Allows you to change the legal owner of a unit. This popup will also list out previous owner history and you can also revert the change by Deleting a record:

NOTE: You CAN NOT enter an ownership start date in the future as other functions within the system works off the dates to run it processes such as demand production and leaseholder statement
Land Registry Title
- Title Number - A unique Title Number is allocated by the Land Registry to every property that is registered with them.
- Title Document - Legal document (Land Registry title deeds) that proves an individual's ownership of a property (will also be uploaded to Document Management and Lease Details) - also shown as a new column against the unit in the Block Summary screen
- Stored - This will only come up if a document is uploaded
- Registered Proprietor - Refers to the person or entity legally owning the land
- Proprietor From - Date the Proprietor was registered

If you uploaded a Title Document then you need to have a Title Number. An error will be displayed if you try save without.
Import from Land Registry

PLEASE BE AWARE THAT YOU WILL BE CHARGED FOR THIS - To turn it on, please see this KB article: 3.5.13 Land Registry Imports
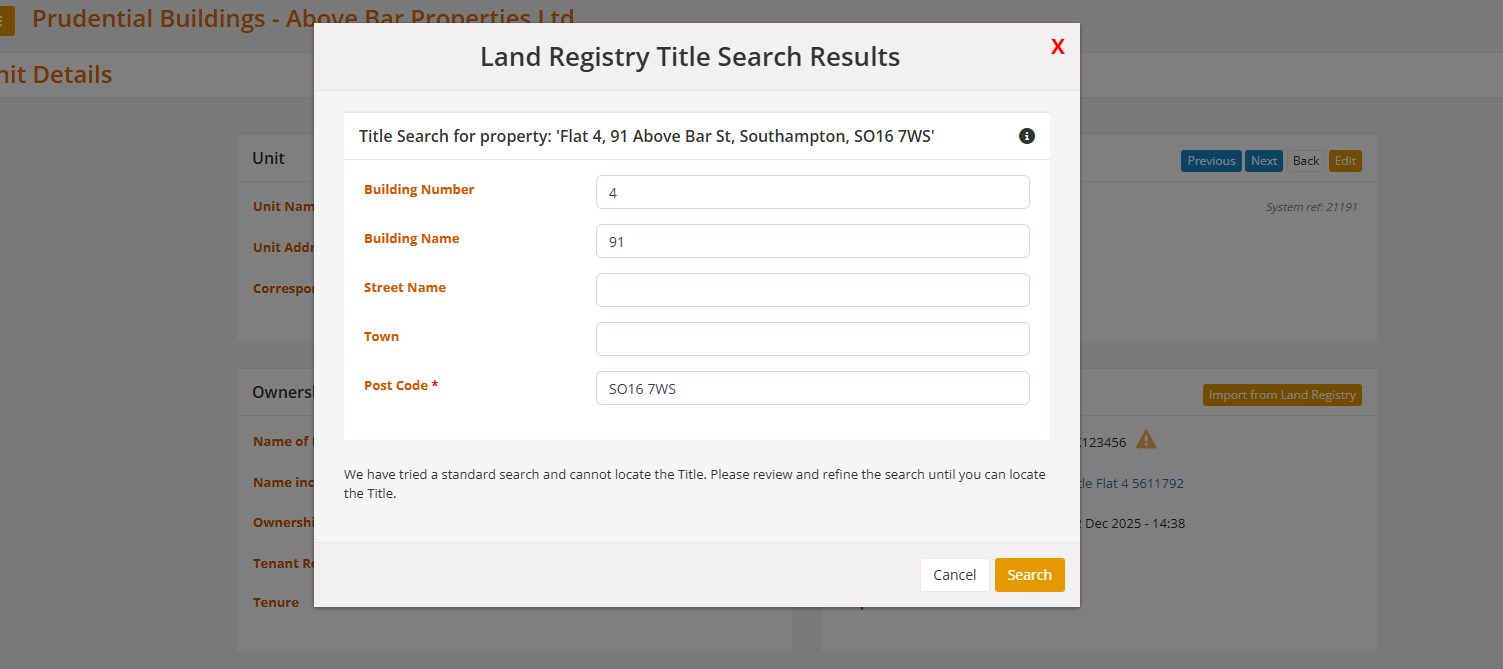
This option allows you to search HMLR for a Title using the unit’s address. The system automatically tries a series of intelligent search patterns and then, if needed, allows you to refine the search in a dedicated Land Registry Title Search screen.s
When an “Immediate” title is available, you can order it directly from the search results. The PDF and structured title data are retrieved from HMLR, stored in our document management service, and the key title details (title number, proprietors, tenure, edition date, etc.) are written back to the Titles table and surfaced on the Unit Details screen.
If you try to use the Import from Land Registry without the module, you will be presented with a warning to turn the module on.
If the search cannot locate the Title, then you will be presented with an option to review and update:
If you click on the 'i' icon then you can find potential matches:
If at all HMLR fails to provide a response, or provides an STATUS other than success, an alert will be displayed with a message saying "The Land Registry System is not responding at the moment please try again later." and an alert message will be sent to us so can investigate. You will then be returned to the Unit details screen.
People Involved - You can add contact details relating to this unit. Here is also where you set unit holders up that you want to give access to the Portal.
- Use the [Add New Person] option to add specific details (e.g. email and telephone numbers) about the people in the property .
If you tick the Management Team / Directors box, then this person is added onto the Block Summary screen.
This lists all the people involved records that had the option ticked when they were created. It gives a clear indication of the contact points for the property manager to help manage the block more efficiently.
Once you add the email address, you can turn the Web Access on which then give access to those users to the Portal (providing the Type is Owner or Agent which can be set when you add a new person involved.
NOTE: An email address which is linked to a Gmail account may have some limitations as Gmail removes any dots.
For example: M.Ram@blocksonline.co.uk will turn into MRam@blocksonline.co.uk so please be aware of this.
For example: M.Ram@blocksonline.co.uk will turn into MRam@blocksonline.co.uk so please be aware of this.
Other and Rentee types do not have access to the Portal
They can then login into the portal via the link that is send if you send the login. More info on the send login: 5.3.4 Giving Access to the Portal
If an email address already exists in the system for another unit in the same block or a different block, then you will receive an alert which links the units together:
When the user then logs into the Portal, they will be able to switch between the units giving them access to the data in both units.
It DOES NOT accumulate transactions together or keep data in one login as different units are handled as different users.
PEEP (Personal Emergency Evacuation Plan) information
You can select whether the person involved is a resident and if they are then whether they are relevant resident (i.e. have mobility issues). This is in relation to PEEP and staying in line with legislation to capture the information.
You can only select the Relevant Resident if the Resident checkbox has been ticked.
You will not be able to select any of these options if the type is 'Agent'.
You can upload and manage Personal Emergency Evacuation Plans (PEEPs) directly against the Person Involved record, ensuring that evacuation plans are securely stored at an individual level and maintained as part of a complete historical record.
This option is available for People Involved who are marked as both:
- Resident
- PEEP Relevant Resident
The option will also appear where a historical PEEP already exists for that individual.
If you click on Manage PEEP, it opens a pop up modal that allows you to view and manage all PEEPs associated with that person.
You need to have the relevant user role in order to access the PEEP Management modal. More info under User Roles on this KB article: 3.5.4 Organisation
If you do not have a PEEPs administrator role then you will be shown this error:
If you do have the relevant role then you will see this screen with different sections:
PEEP History
The screen displays a chronological history of PEEPs, ordered with the most recent Review Date first, and includes:
- Review Date
- Expiry Date
- Upload Date
If you click on View then it opens up that document for you to see. When uploading a new PEEP, you will be required to provide a Review Date and Expiry Date. The system will automatically suggest an Expiry Date of Review Date + 1 year minus 1 day, though this can be adjusted before saving.
To support accurate record keeping:
- Only PDF files can be uploaded for PEEPs.
- The Review Date must be within today and one year from today.
- The Expiry Date must not be earlier than the Review Date and cannot exceed the allowed date range.
For data integrity and compliance, once a PEEP has been uploaded it becomes a permanent read-only historical record and cannot be edited or deleted.
PEEP Access Log
This shows who has accessed the data and when in order to keep an audit as it contains sensitive information.
There are two reports that can be ran from the Workbench -> Reporting -> under Health & Safety group in relation to PEEPS:
1. PEEPs Action Summary
This report allows users to quickly understand the current status of PEEPs across all Involved Persons. It highlights:
- Individuals who do not have a PEEP recorded
- Individuals whose PEEP requires review
- Individuals who have a valid PEEP in place
This enables teams to proactively identify gaps and ensure that residents who require evacuation support have an up-to-date plan in place.
2. High Risk Building Actions Needed
This report helps users review the classification status of their blocks and identify where action is required. It allows users to:
This report helps users review the classification status of their blocks and identify where action is required. It allows users to:
- Identify blocks that have not yet been classified
- View a list of Higher-risk Buildings
- View Buildings over 11m
- View Lower Risk Buildings
Notes - You can add general notes about the unit here.

You can also [Delete] units providing that they meet certain criteria's. If they don't then you will be prompted with a warning:
Please see this article for information on a frequently asked question relating to the change of ownership: 4.11.3 What should I do when the ownership of a flat changes?
To add the Unit Details and People Involved details in bulk, please see point 4 of this KB article: 3.1.3 Agent Management
Related Articles
3.1.3 Agent Management
Blocks Online provides a number of administrative functions which are typically only required on an infrequent or extraordinary basis. 1. Agent Suppliers - This is where you set your global list of suppliers that can then be linked to the blocks in ...4.11.7 How to produce a Leaseholder statement or statements?
There are three main system areas where leaseholder statements can be produced: 1. In the Block Area -> The Block -> Block Reports ->Leaseholder Statement -All Units can be produced for all units in a block: Once you have selected ‘Leaseholder ...4.7.1 Block Insurance
Blocks Online provides the facility to allow the tracking and monitoring of insurance policies. Accessed via the menu option: The Block -> Block Insurance. This screen is used to record details of insurance policies (e.g. buildings insurance, D&O) ...3.2.3 Deactivate a Block
Accessed via the menu option: Block Management –> Deactivate Block Deactivate an active block All new blocks will be given a status of Active when they are first registered. If you no longer manage a block then you can ‘Deactivate’ the block. When ...4.2.6 STEP 7 - Block Services
Access via Finance -> Set-up -> Block Services To watch a video on how to carry out this process, please click on this video: 4.2.6 STEP 7 - Block Services The Block Services screen displays the relevant services listed against the relevant Block you ...